Establish BGP Peering

A BGP session establishes a point-to-point connection between your virtual device and your cloud service provider. To create BGP peers, you must have the following information:
1) A provisioned virtual device with a registered license.
2) A provisioned connection (connectionUuid).
If you have the above information, then you can skip ahead to Step 4 and create BGP peers. Otherwise, follow the steps:
Refer to Network Edge BGP Service for additional information.
Step 1: Authenticate
Submit your user credentials, Client ID, and Client Secret for OAuth2 authentication.
See Generating Client id and Client Secret under the Getting Access Token section for instructions to create a client ID and client secret. See Requesting Access and Refresh tokens for instructions to call the Oauth API to validate and authenticate your credentials.
If you are unaware of your user credentials, contact your local Equinix Service Desk.
Step 2: Create/Get Virtual Devices
a) To create a virtual device, please follow the steps on the Getting Started.
b) To check the status of your virtual device, call the Get Virtual Device {uuid} API or the Get Virtual Devices API.
You may skip the above step if you have a provisioned device with a registered license.
Step 3: Create/Get connection
a) To connect to your cloud service providers, follow the steps on the Getting Started.
b) To check the status of your connections, call the Get L2 Connection {uuid} API.
You may skip this step if you have a provisioned connection.
Step 4: Create BGP Peering
| POST /ne/v1/bgp | |
|---|---|
| Method | POST |
| URL or End Point | /ne/v1/bgp |
| Headers | Authorization token, Content-Type |
| Query Parameters | Not applicable |
| Body Parameters | authenticationKey, connectionUuid, localAsn, localIpAddress, remoteAsn, remoteIpAddress |
This request creates a BGP session to establish a point-to-point connection between your virtual device and cloud service provider.
To obtain an authorization token, refer to Requesting Access and Refresh tokens under the Getting Access Token section.
A sample curl request to create BGP peering:
curl -X
POST "https://api.equinix.com/ne/v1/bgp"
-H "Authorization: Bearer CcYxLosIYIIsmCGav5pplU25dLkG"
-H "Content-Type: application/json"
-d '{
  "authenticationKey": "testkey1",
  "connectionUuid": "80afc8be-0ce3-4950-be27-3d3e678e6873",
  "localAsn": 10012,
  "localIpAddress": "10.0.0.1/29",
  "remoteAsn": 10013,
  "remoteIpAddress": "10.0.0.2"
}'
| Body Parameter Name | Mandatory | Type | Example | Possible Values | Description |
|---|---|---|---|---|---|
| authenticationKey | No | string | pass123 | Provide a key value that you can use later to authenticate. | |
| connectionUuid | Yes | string | f79eead8-b837-41d3-9095-9b15c2c4996d | Unique Id of the connection between the virtual device and the cloud service provider. | |
| localAsn | Yes | integer | 10012 | Local ASN (autonomous system number). This is the ASN of your virtual device. | |
| localIpAddress | Yes | string | 100.210.1.221/30 | Local IP Address. This is the IP address of the virtual device in CIDR format. | |
| remoteAsn | Yes | integer | 10013 | Remote ASN (autonomous system number). This is the ASN of the cloud service provider. | |
| remoteIpAddress | Yes | string | 100.210.1.31 | Remote IP address. This is the IP address of the cloud service provider. |
Sample response:
{
    "uuid": "64e46bc1-fc2c-43b8-956e-213afe8f5d39"
}
Response description:
| Field | Type | Example Values | Description |
|---|---|---|---|
| uuid | string | Unique Id of the BGP peering. |
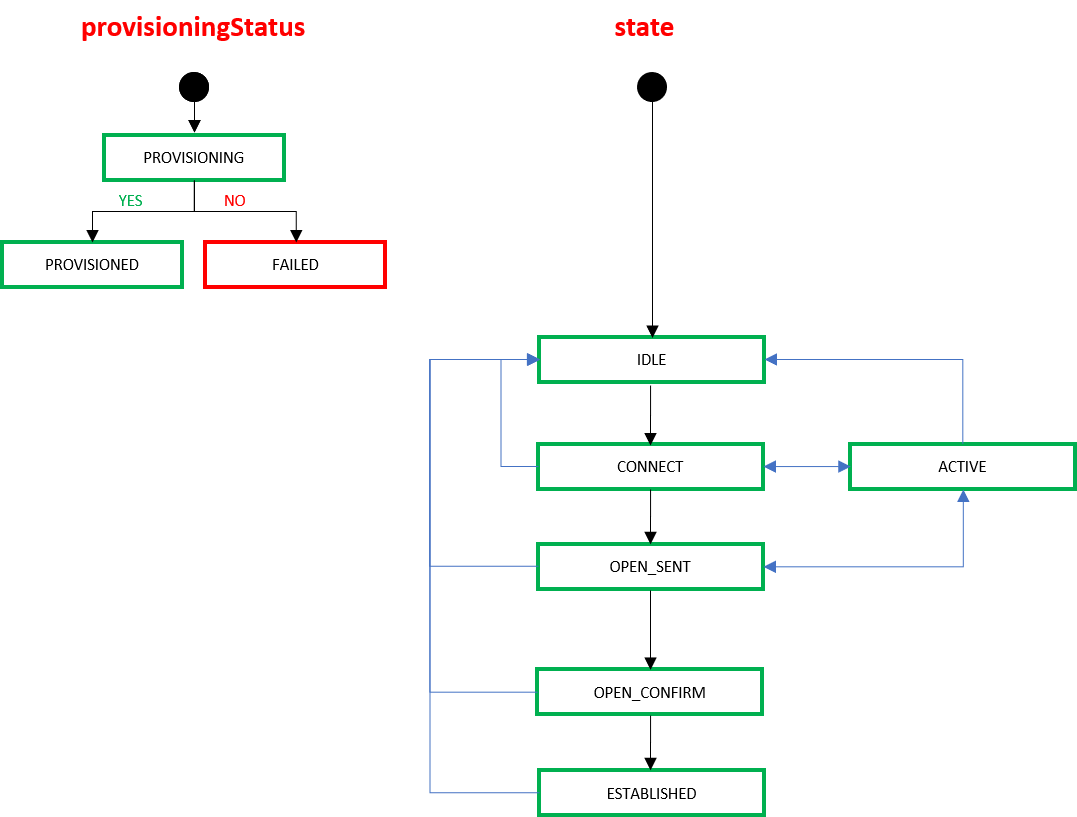
After you create BGP peering, you can check the status of your BGP peering by calling GET BGP {uuid}.
| BGP provisioningStatus | Description |
|---|---|
| PROVISIONING | BGP peering is provisioning. |
| PROVISIONED | BGP peering is provisioned. |
| FAILED | BGP peering failed. |
Possible BGP states: Idle, Connect, Active, Established, OpenSent, and OpenConfirm.
The BGP states can be only be seen after the BGP is provisioned.

If you get “Access Denied,” please contact your local Equinix Service Desk.